Guide to Schedules
This guide is a full rundown of Shiplight AI's Schedule feature, including what they are, what they do, and how to create them.
Table of Contents:
1. What is a Schedule
A Schedule (internally called Test Plan) is a way to run your tests automatically at regular intervals. Schedules can include both individual test cases and test suites, and can be configured to run on a recurring basis using cron expressions. They provide detailed reporting on test results, pass rates, and performance metrics.
2. Making a Schedule
The Schedule page is located on the left sidebar. Upon opening the page you can see existing Schedules, as well as the Create Test Schedule button in the top right. Schedule creation can also be started by pressing the  in the top left corner, then selecting Create Schedule.
Schedule Creation should look like this:

Basic Info
Basic Information covers the Schedule title, as well as an optional description.
Test Selection
Test cases or suites can be searched. They can also be selected in the menu underneath the search bar. Test cases and suites can also be manually added or removed after creation.
⚠️ Test cases will be ran for each time they are selected. That means test cases that belong to multiple selected suites, or test cases that are both individually selected as well as belong to a selected suite, will be ran multiple times.
Schedule Configuration
Environment Selection:
- Selecting an Environment is required for creating a Schedule
- For test cases with multiple configurations, the configuration matching the Schedule's environment will be used
- Test cases without a matching environment configuration will display a warning and be skipped during execution
Schedule Timing:
- Start Date (Optional): When the schedule should begin. If left empty, it starts immediately
- End Date (Optional): When the schedule should stop. If left empty, it runs indefinitely
- Repeat: Uses a cron expression editor to set the execution frequency (hourly, daily, weekly, monthly, etc.)
⚠️ Schedules without a valid repeat interval will not run automatically, but can still be executed manually.
3. Navigating to the Schedule UI
The website will automatically direct you to the Schedule UI after creation. The Schedule UI can also be reached by clicking on the Schedule in the Schedules page.
The Schedule UI should look like this:

Overview
The Overview tab displays the Schedule configuration, including:
- Environment selection
- Test Account Group (optional override)
- Hooks (optional override for before/after test templates)
- Start and End dates (optional)
- Repeat schedule (cron expression)
- Schedule status (Active/Disabled)
- Save button to apply any changes
Test Account Group:
Override test accounts for all tests in the schedule:
- None: Use each test's configured account
- Any: Select randomly from available accounts for this environment
- Specific: Use specific accounts for all tests
Hooks:
Override hooks for all tests in the schedule:
- Before Test: Template to run before each test (after login)
- After Test: Template to run after each test (including teardown)
- Leave empty to use each test's own configured hooks
Tests
This tab allows modifications to selected Test Suites as well as individual Test Cases. To switch between Test Suites and Test cases, click on their respective tabs located on the left side.
To add a Test Case or a Test Suite, click on the + sign located in the top right corner of their respective tabs. To remove a Test Case or Test Suite, either click it then press the Remove Selected button that appears in the bottom right, or press the ... located on the right of the test then click Remove from plan.
⚠️Make sure to set the status for each test case to active. If left as draft, they will not be ran, even if the Schedule is ran. You can change status in the Tests page or in a Suite containing desired test case.
Report
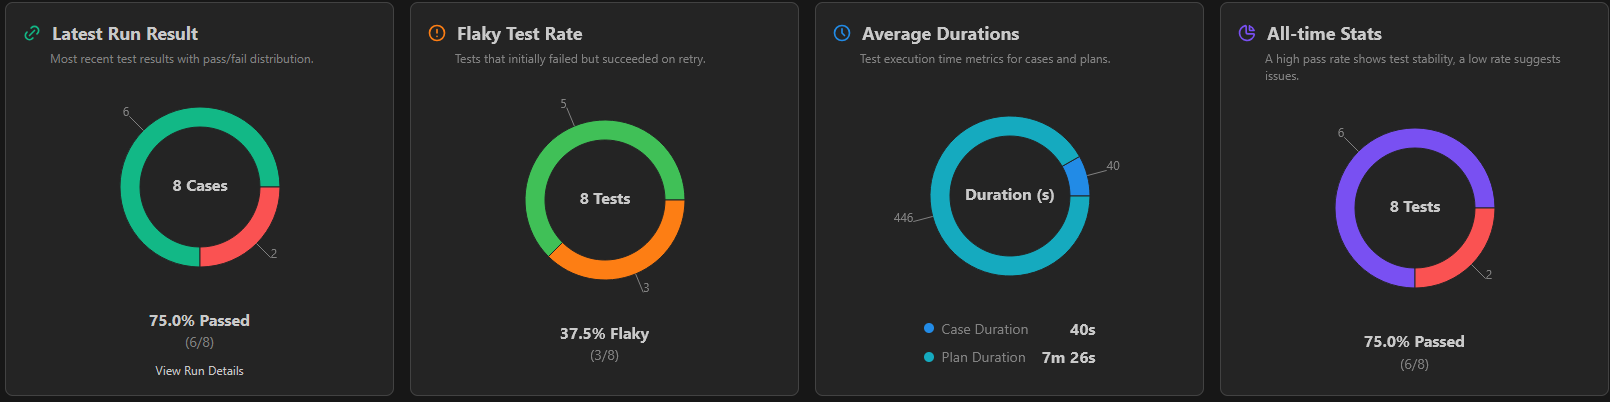 Report gives a summary of results, along with useful metrics.
- Latest Test run: Displays passed and failed stats for the latest test run
- Flaky test rate: A flaky test is a test case that switches between passed and failed. This metric shows which percentage of test cases are flaky.
- Average Duration: Shows average test case duration, as well as total Schedule run duration.
- All time Stats: Displays passed and failed stats over every test run
- Run trend over time: Shows passed and failed stats for every test run, going by chronological order
- Test Case History: Provides a detailed visual history of each test case's performance over time
Test Case History Details
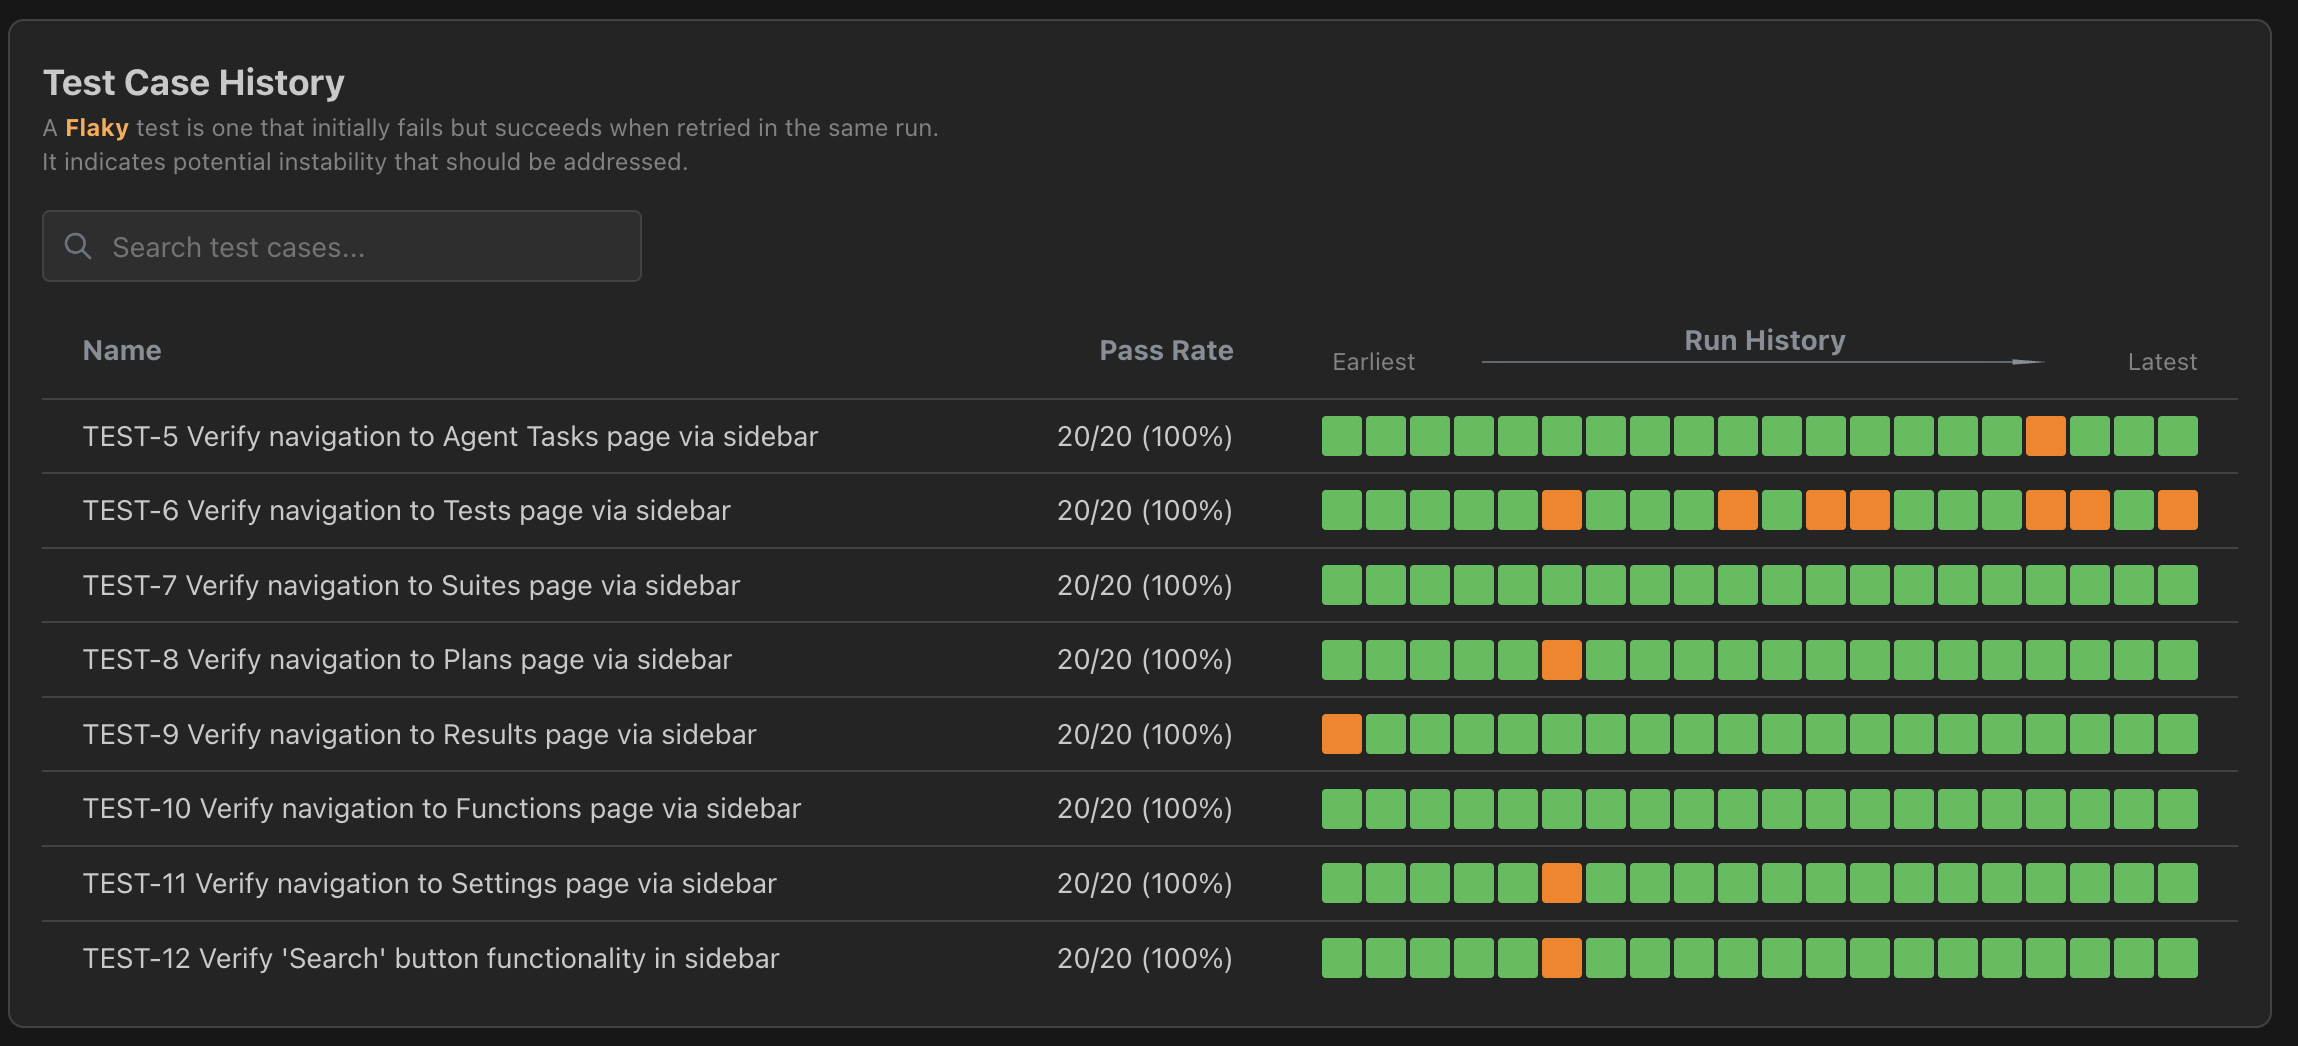
The Test Case History section displays a comprehensive grid showing:
- Test Case Names (left column): Lists all test cases included in the schedule
- Run History (horizontal timeline): Each column represents a test run with:
- Date and time of the run at the top
- Color-coded results for each test case:
- 🟢 Green: Test passed
- 🔴 Red: Test failed
- 🟡 Yellow: Flaky test (inconsistent pass/fail results)
⚠️ Clicking on a run will redirect you to the run page. For more information visit the Navigating Results Guide.
Notifications
Configure who gets notified about test results:
Email Notifications:
- Add multiple email addresses to notify team members
- Recipients receive test results and status updates
- Simply enter email addresses in the provided field
Slack Notifications:
- Configure Slack channels to receive notifications
- Set up Slack integration through Settings
- Filter notifications by result type (passed, failed, status changes)
- Customize which events trigger notifications