Navigating the Settings Page
This guide provides a detailed explanation of the functions inside the settings page.
Table of Contents
- General
- Environments
- Test Accounts
- Variables
- API Tokens
- Labels
- Integrations
- Notifications
- Knowledge
- Test Data
- Appendix: Google 2FA Setup Guide
1. General
The General settings tab allows you to manage your profile information and application preferences.
Profile Settings
- Profile Picture: Click on your avatar to upload a new profile picture. Supported formats include PNG, JPEG, and JPG with a maximum file size of 5MB. You can also clear your current avatar using the Clear button.
- Email: Your email address is displayed but cannot be changed from this interface.
- Full Name: Enter or update your full name which will be displayed throughout the application.
Appearance Settings
- Theme: Toggle between light and dark modes using the theme switcher to customize your visual experience.
2. Environments
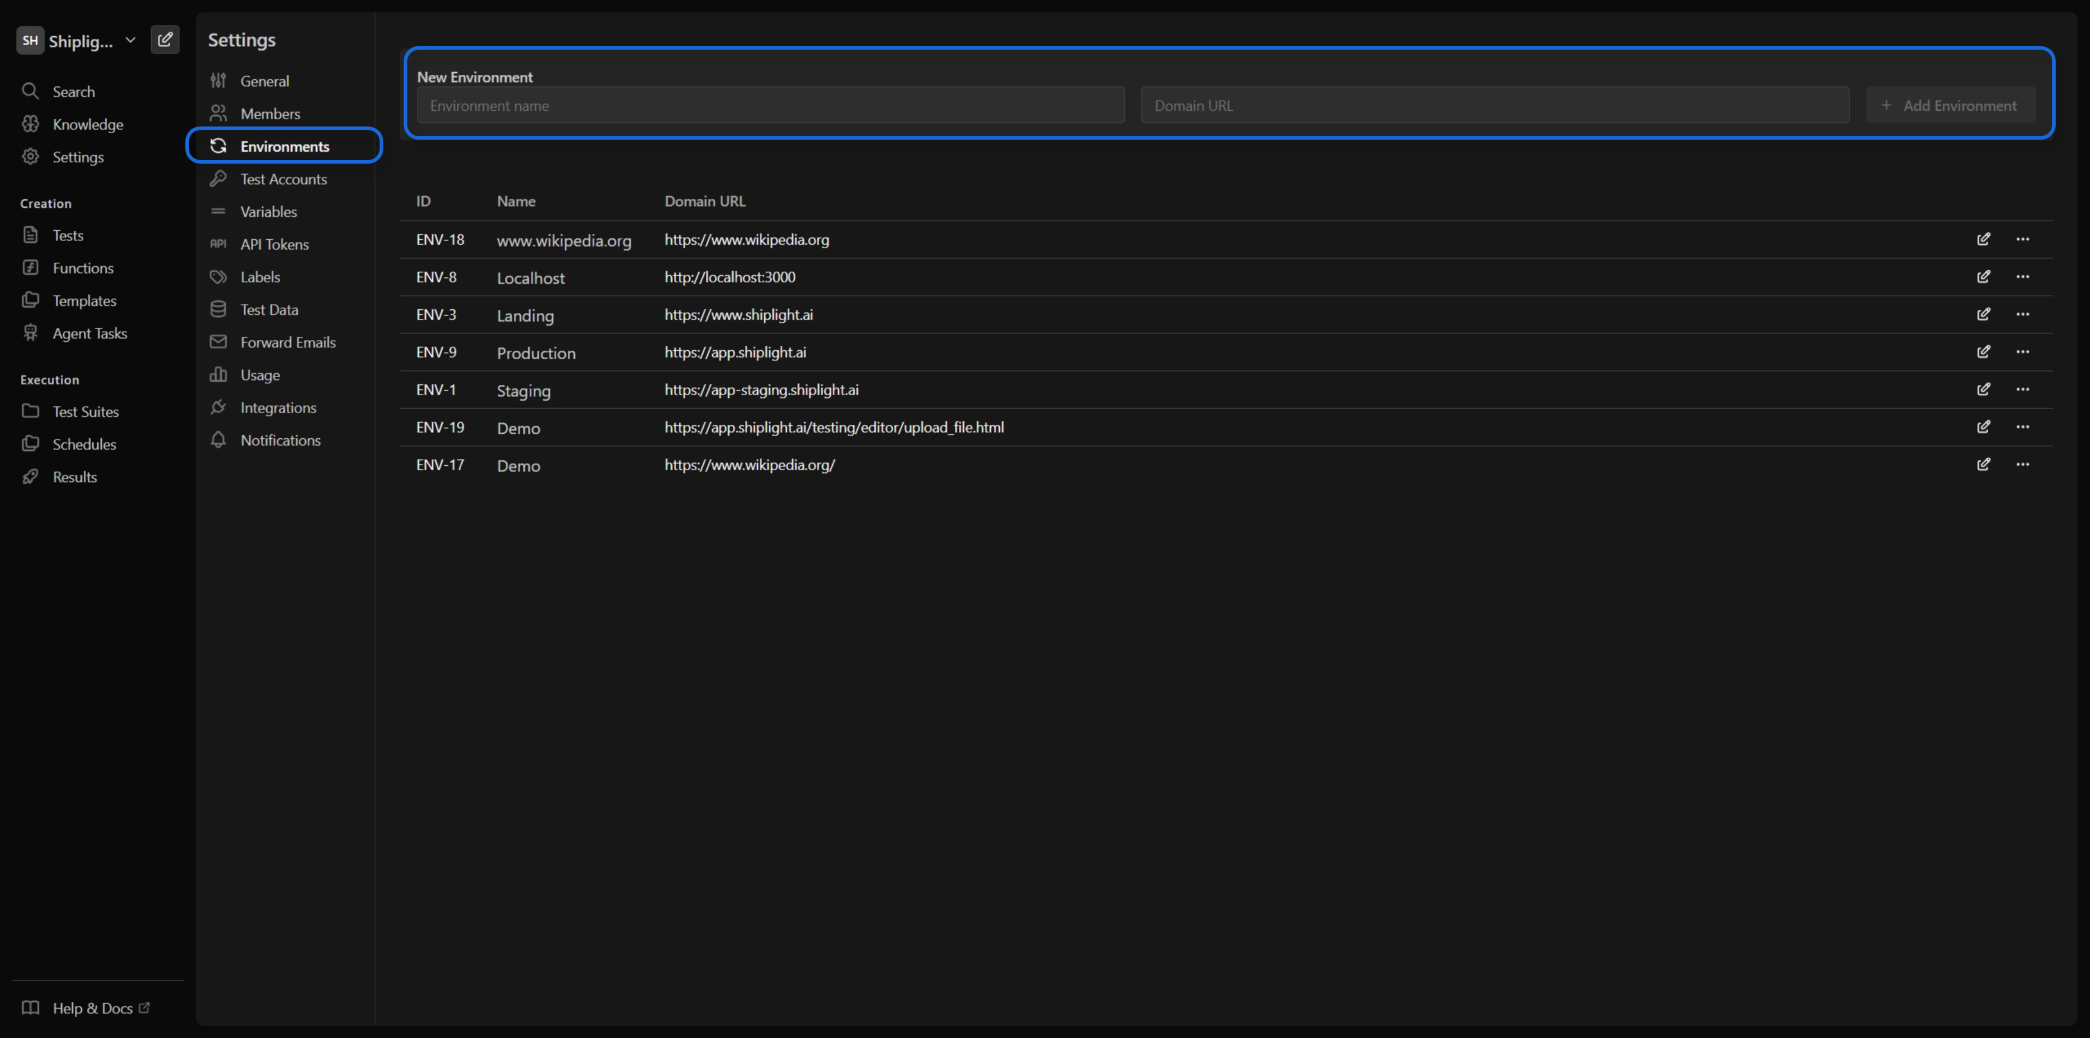
Environments represent the different domain URLs where your tests will run. Each environment can have its own configuration, test accounts, and variables.
Managing Environments
- Add Environment: Enter a name and domain URL, then click the "Add Environment" button
- Edit Environment: Click the menu (⋯) next to an environment and select "Edit"
- Delete Environment: Click the menu (⋯) next to an environment and select "Delete"
⚠️ Important: Environments should only contain the domain URL (e.g.,
https://example.com). Specific paths and routes can be configured within individual tests.
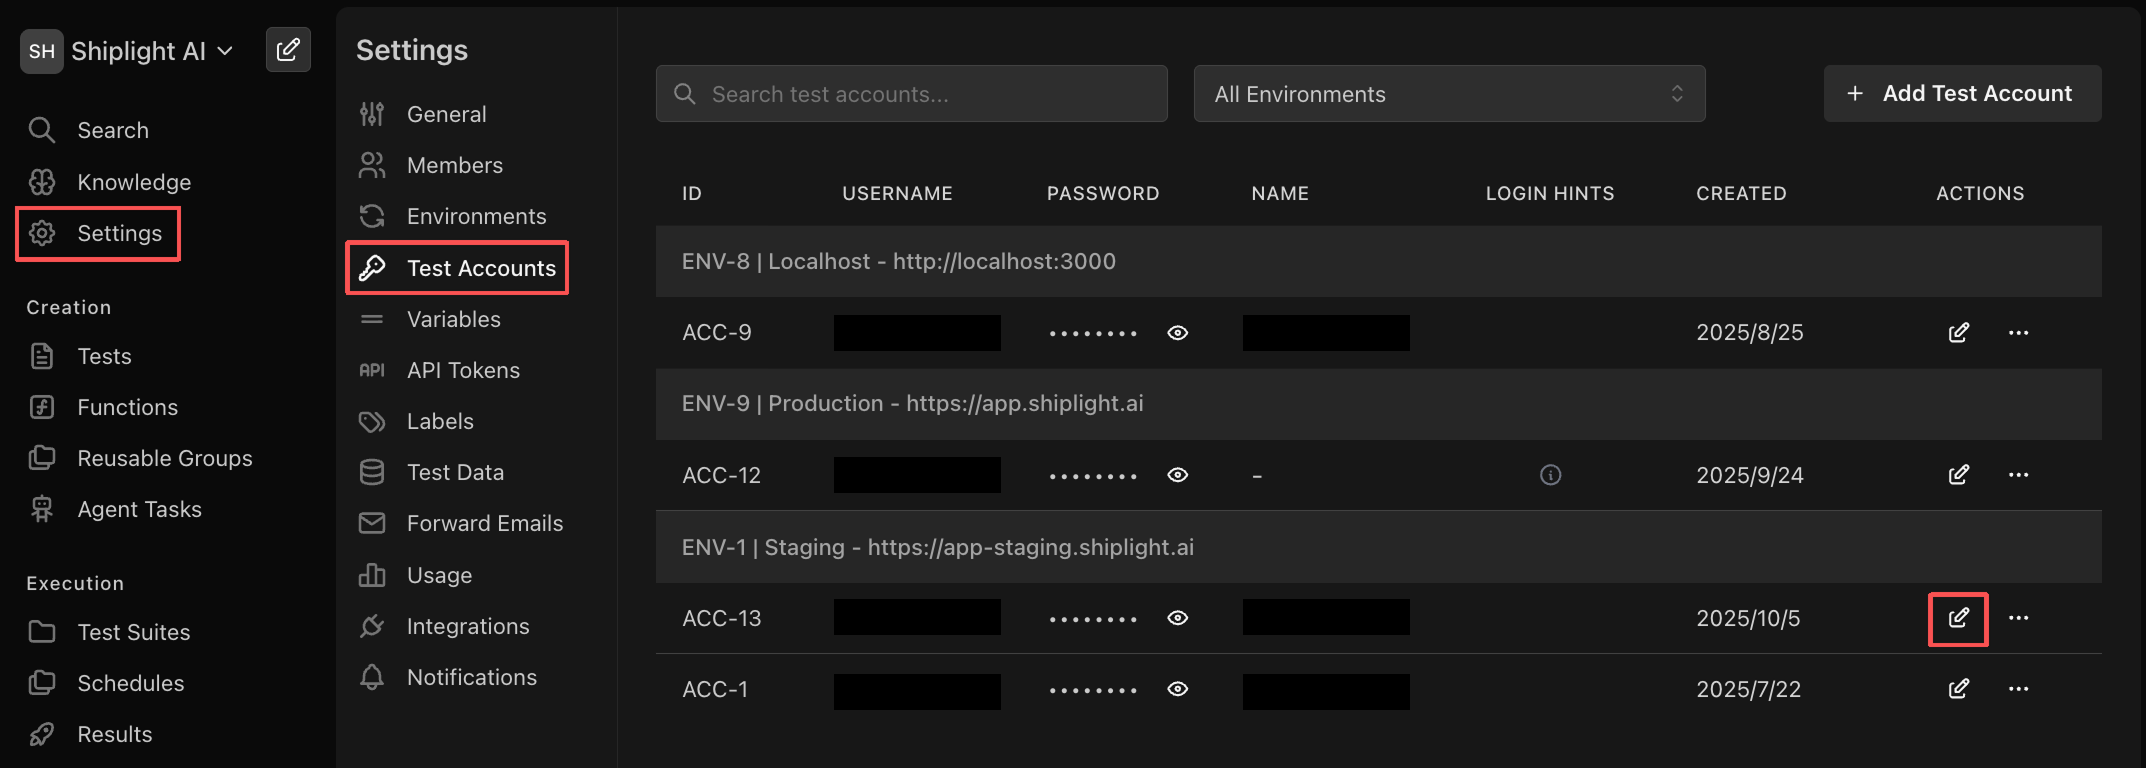
3. Test Accounts
Test accounts are user credentials that can be used for authentication during test execution. These accounts are scoped to specific environments.
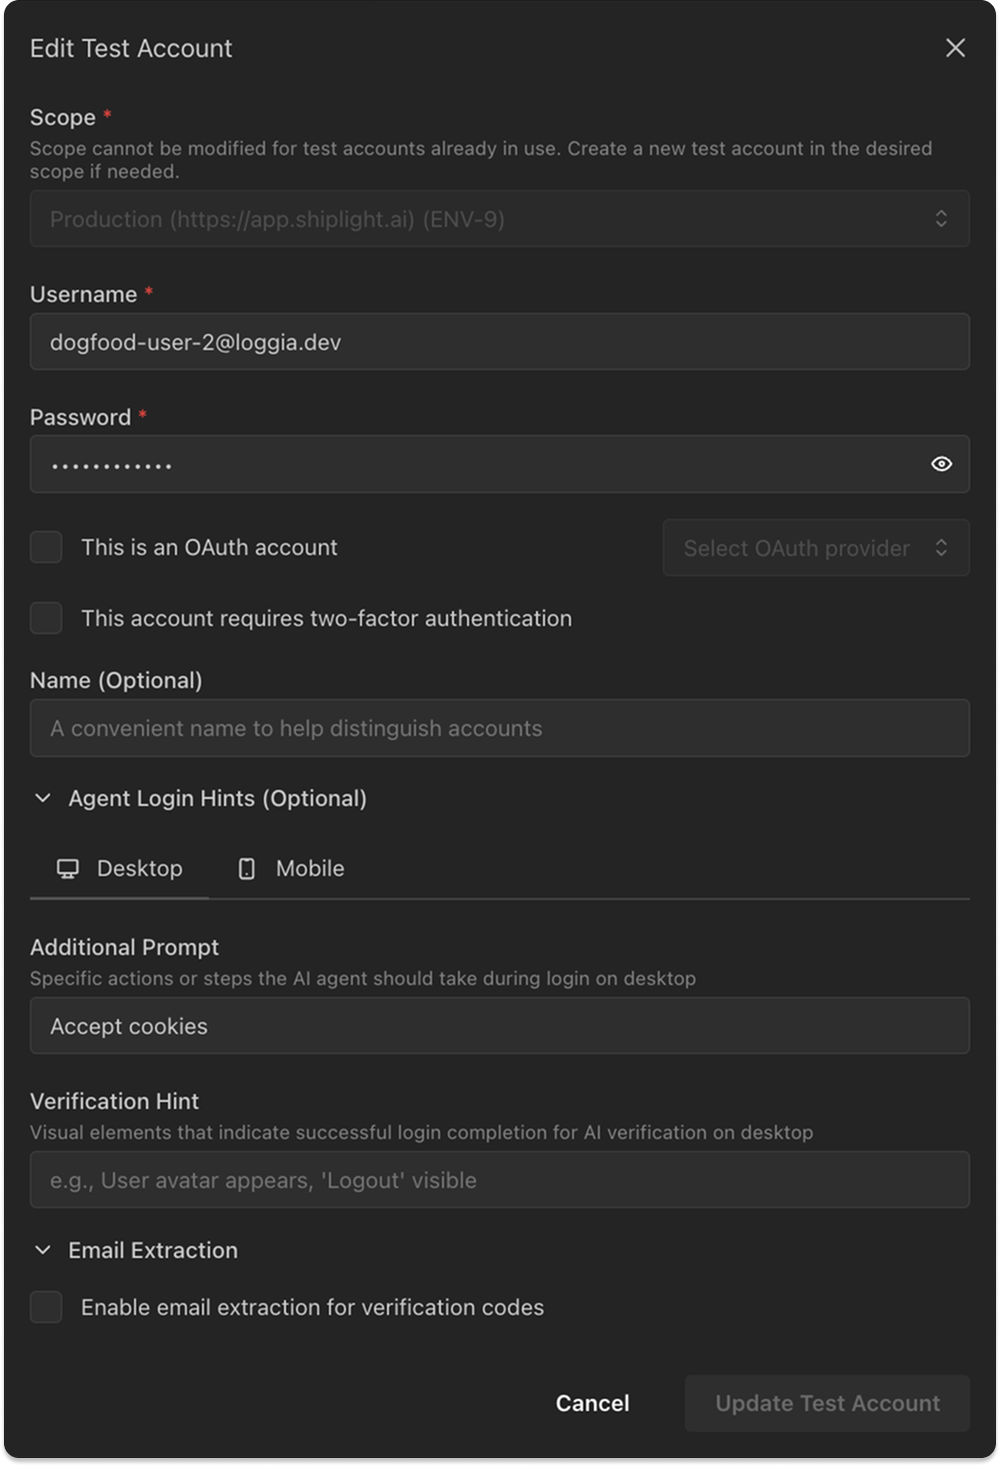
Account Configuration
- Scope: Select the environment where this account will be used
- Username: The login username or email for the test account
- Password: The account password (stored securely and can be shown/hidden with the eye icon)
- OAuth Configuration:
- Check "This is an OAuth account" to enable OAuth authentication
- Select OAuth provider (currently supports Google)
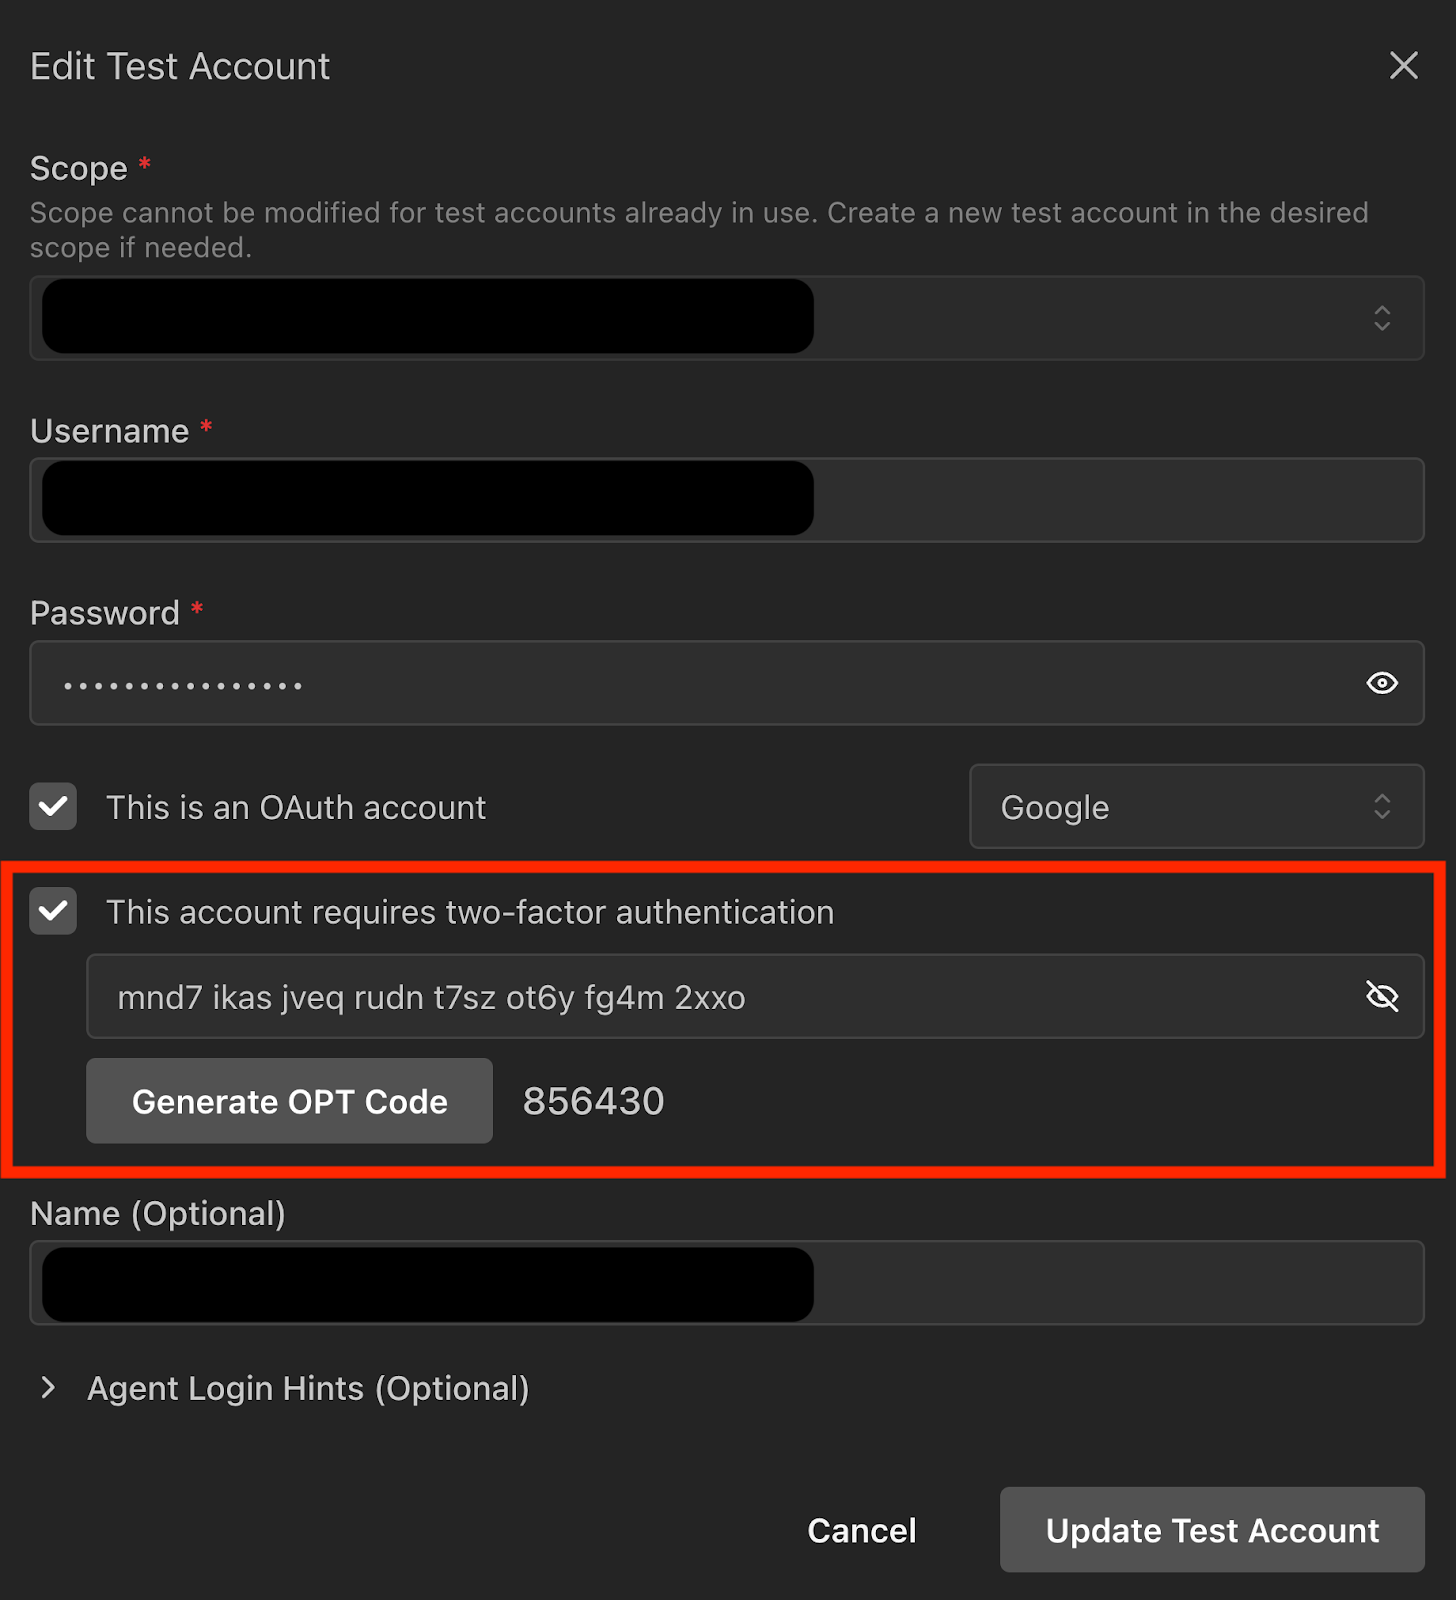
- Two-Factor Authentication:
- Check "This account requires two-factor authentication" to enable 2FA
- Enter the TOTP secret key for generating authentication codes (Refer to the 2FA setup guide)
- Name: Optional friendly display name to help distinguish between accounts
Advanced Options
- Additional Prompt: Extra instructions to help the AI agent during login (e.g., "Skip intro video", "Close any popup notifications")
- Verification Hint: Hints to verify that the login was successful (e.g., "'Dashboard' text should be visible")
Managing Test Accounts
- Add Account: Click the "Add Test Account" button to open the creation modal
- Fill in the required fields: Scope (environment), Username, and Password
- Optionally configure OAuth settings, 2FA, and advanced options
- Click "Create Test Account" to save (button is disabled until all required fields are filled)
- Edit Account: Click the edit icon (✏️) in the rightmost column to modify existing accounts
- Make changes to any configuration options
- Click "Update Test Account" to save changes (button is disabled if no changes are made)
- Delete Account: Click the delete icon (🗑️) in the rightmost column to remove accounts
Validation
- Username must be unique within the selected environment
- All required fields (Username, Password, Scope) must be filled
- OAuth accounts must have a provider selected
- 2FA accounts must have a valid TOTP secret key
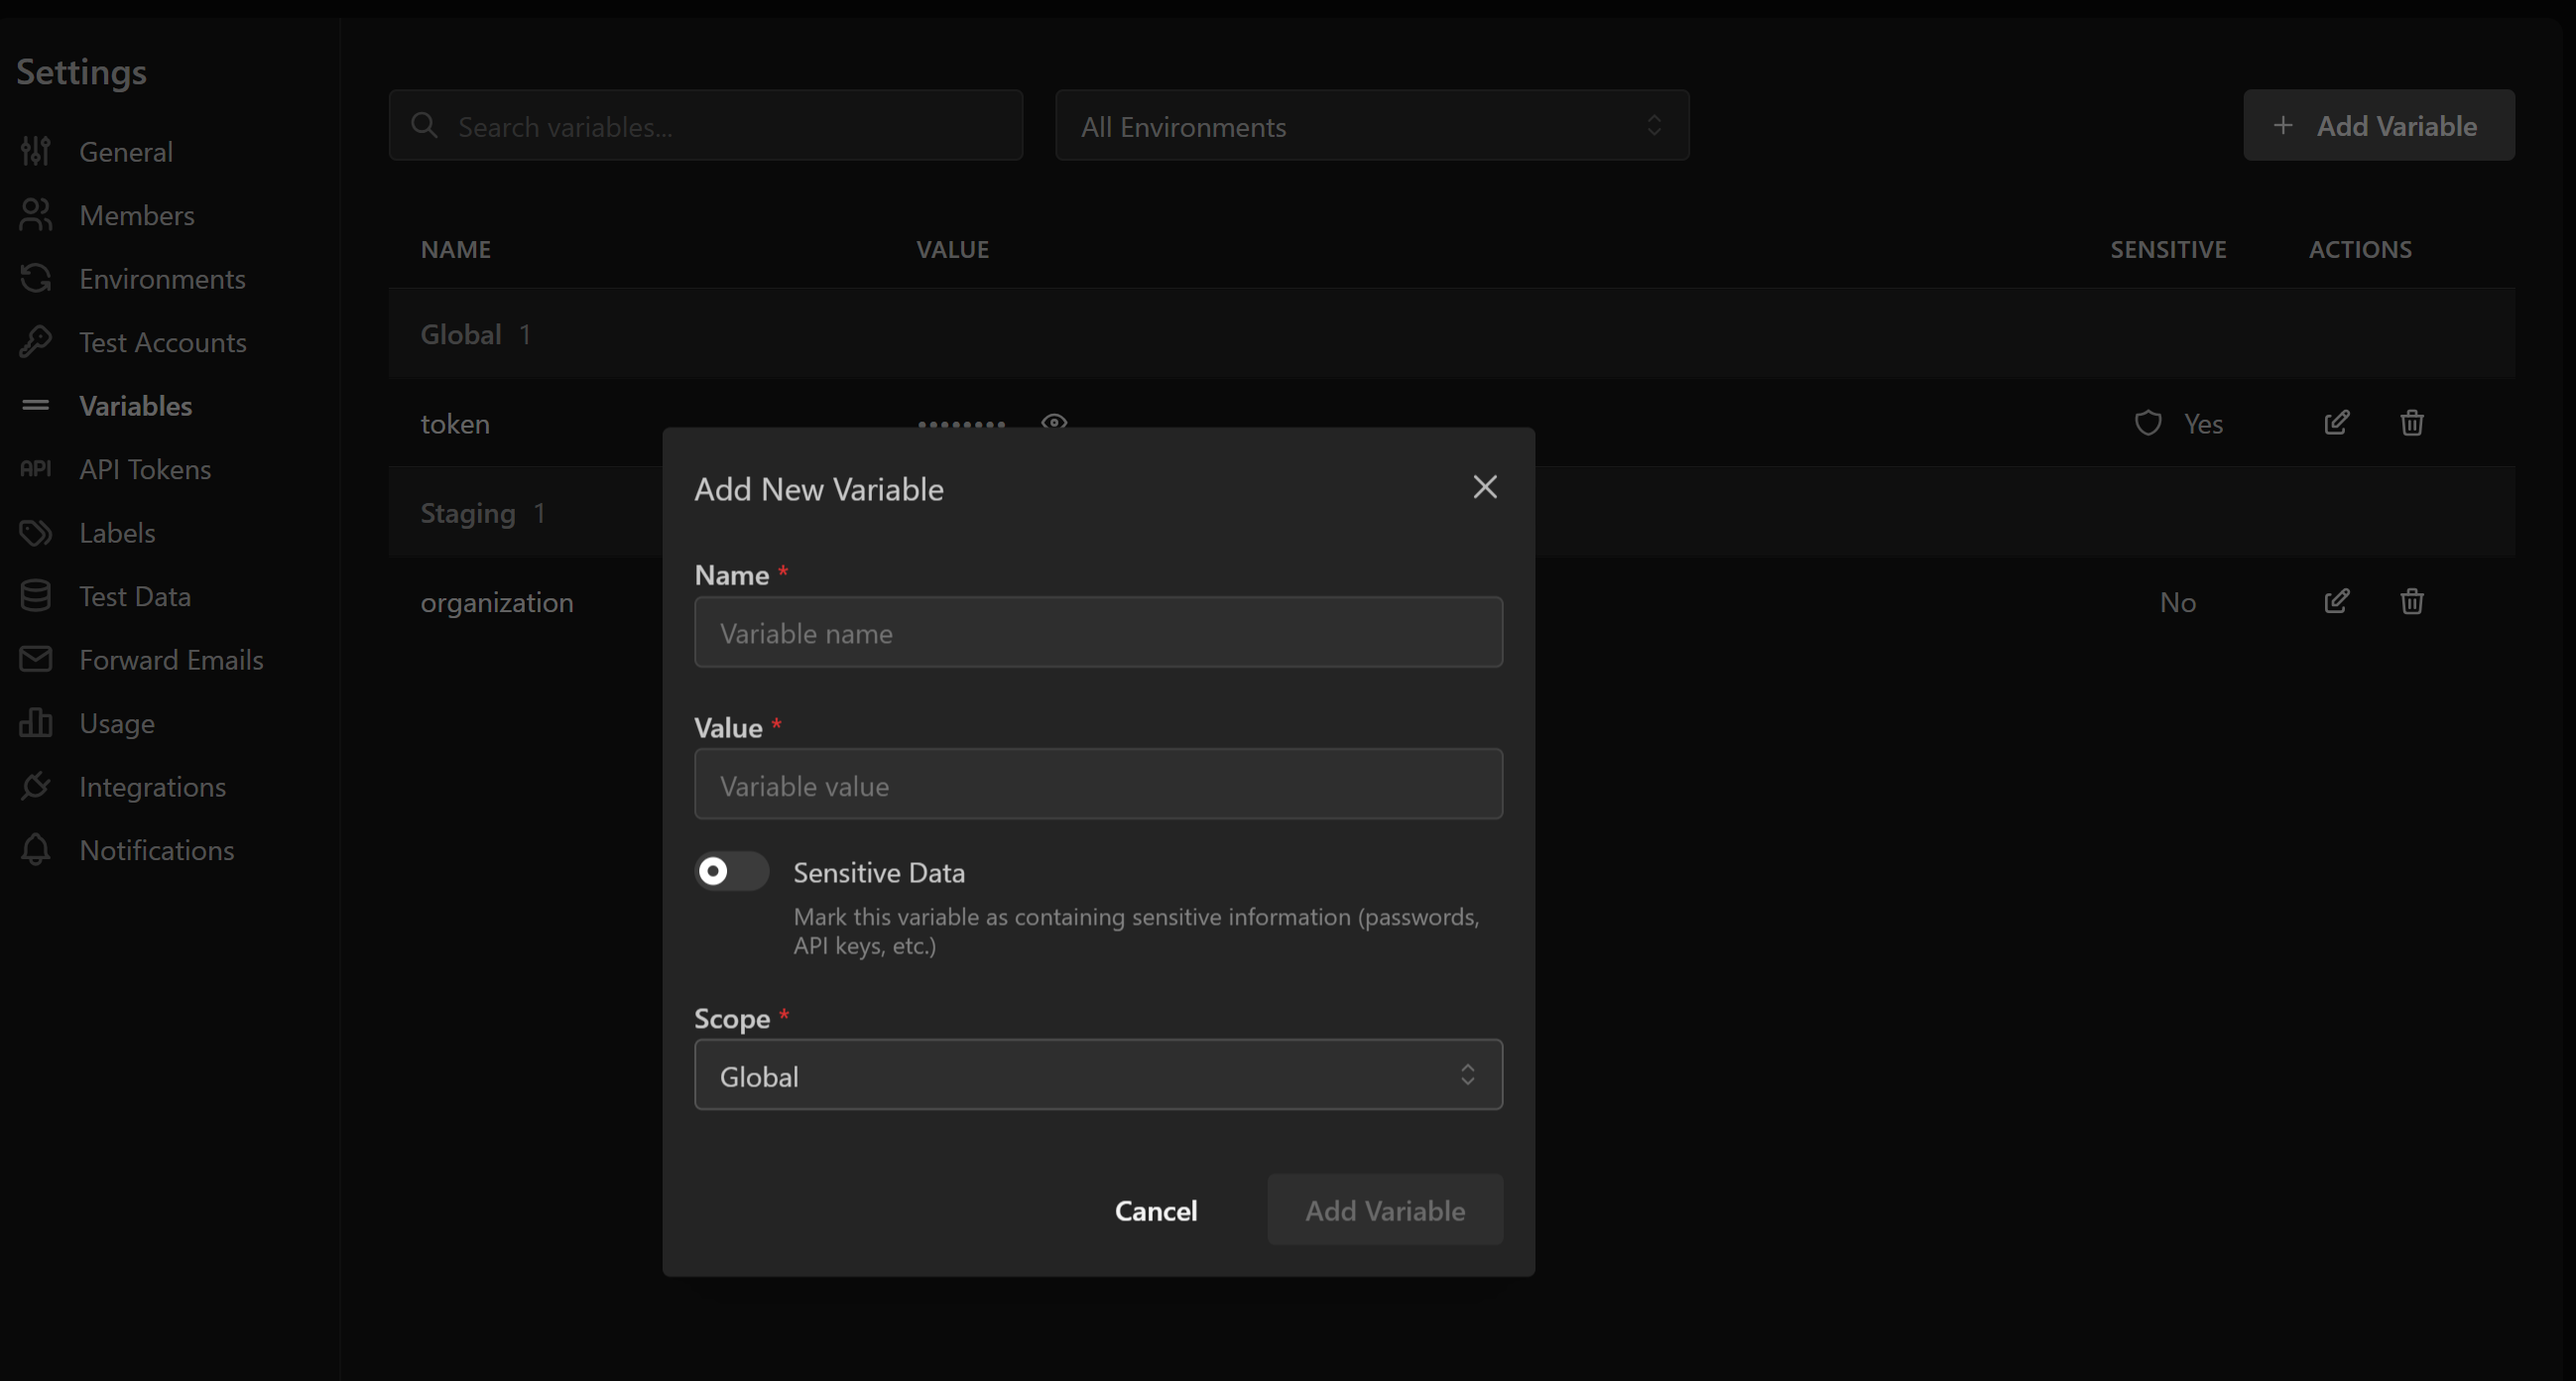
4. Variables
Variables allow you to define reusable values that can be referenced in your tests. They support different scopes for maximum flexibility.
Variable Scopes
- Global Variables: Available across all environments and tests
- Environment-Specific Variables: Only available when running tests in a specific environment
- Test-Specific Variables: Scoped to individual test cases (configured in the test editor)
Managing Variables
- Add Variable: Click the "Add Variable" button to create a new variable
- Name: The variable identifier (e.g.,
API_KEY,BASE_URL) - Value: The actual value
- Sensitive Data: Mask the variable value in the UI and prevent it from being exposed in logs
- Scope: Choose between Global or a specific environment
- Name: The variable identifier (e.g.,
- Search & Filter: Use the search bar to find variables by name or value, and filter by environment
- View/Hide Values: Click the eye icon to toggle visibility of sensitive values
- Edit Variable: Click the edit icon to modify existing variables
- Delete Variable: Click the trash icon to remove variables
Using Variables in Tests
Variables can be referenced in test steps using the syntax $VARIABLE_NAME or {{VARIABLE_NAME}}. The test runner will automatically replace these placeholders with actual values during execution.
5. API Tokens
API tokens provide programmatic access to Shiplight AI's REST API, enabling integration with CI/CD pipelines and external tools.
Token Management
- Create Token: Generate a new API token with a descriptive name
- View Token: Click the eye icon to reveal the token value (tokens are masked by default for security)
- Copy Token: Use the copy button to quickly copy tokens to your clipboard
- Revoke Token: Delete tokens that are no longer needed
Security Best Practices
- Store tokens securely in your CI/CD system's secret manager
- Rotate tokens regularly
- Use descriptive names to identify token usage
- Revoke unused tokens immediately
6. Labels
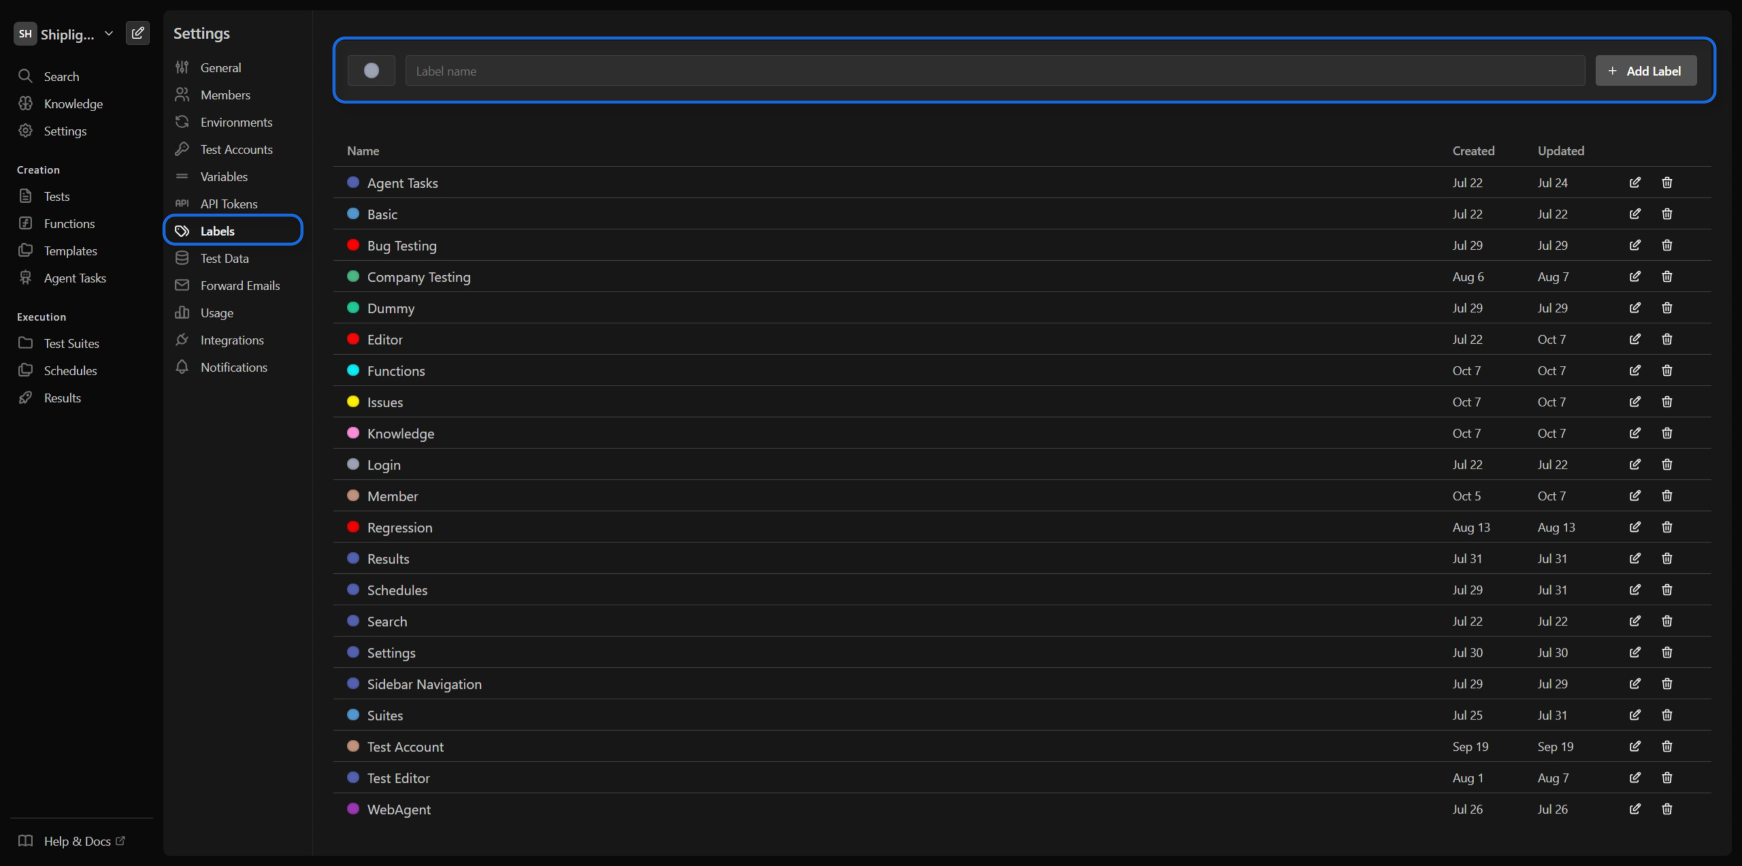
Labels help organize and categorize your test cases for better visibility and management.
Creating Labels
- Name: Enter a descriptive label name
- Color: Click the color selector to choose from predefined colors
- Icon: Optionally select an icon for visual distinction
Using Labels
- Apply labels to test cases for categorization (e.g., "Critical", "Regression", "Smoke Test")
- Filter test results and reports by labels
- Use labels in test suite configurations
Managing Labels
- Edit Label: Click the edit icon to modify name or color
- Delete Label: Click the trash icon to remove unused labels
7. Integrations
Connect external services to enhance your testing workflow and receive notifications.
Available Integrations
Linear
- Purpose: Sync issues and project data between Linear and Shiplight AI
- Features:
- Automatic issue creation for test failures
- Link test cases to Linear issues
- Sync project milestones with test plans
- Setup: Click "Connect Linear" to authenticate via OAuth
Slack
- Purpose: Receive test notifications and alerts in your team channels
- Features:
- Real-time test result notifications
- Failure alerts with screenshots
- Daily/weekly test summary reports
- Configurable notification settings (choose which events trigger notifications)
- Setup: Click "Connect Slack" to add the Shiplight bot to your workspace
- Settings: Configure notification preferences after connecting
Managing Integrations
- Connect: Click the connect button for each service
- Configure: Use the settings icon to customize integration behavior
- Revoke Access: Remove integrations that are no longer needed
8. Notifications
Configure how and when you receive notifications about test results and system events.
Notification Channels
- Email: Notifications sent to your registered email address
- Slack: Real-time notifications in configured Slack channels
- In-App: Notifications within the Shiplight AI dashboard
Notification Types
- Test Failures: Immediate alerts when tests fail
- Schedule Completions: Summary reports after scheduled test runs
- System Alerts: Important system updates and maintenance notifications
Managing Notifications
- Connect Slack Channel: Click "Connect a new channel" and select your desired Slack channel
- Disconnect Channel: Remove channels using the "Disconnect" button
- Configure Preferences: Set notification frequency and types for each channel
9. Knowledge
The Knowledge base allows you to provide context and domain-specific information to help the AI better understand your application. Knowledge can be platform-specific or global, and supports rich text formatting with images.
Adding Knowledge
- Create Entry: Click "Add Knowledge" to create new entries
- Platform Selection: Choose whether knowledge applies to:
- All Platforms: General knowledge applicable everywhere
- Web: Web browser-specific information
- iOS: iOS app-specific knowledge
- Android: Android app-specific knowledge
- Title: Provide a descriptive title for the knowledge entry
- Content Editor: Use the rich text editor to create formatted content
🆕 Rich Text Editor Features
The knowledge editor supports advanced formatting:
- Text Formatting: Bold, italic, underline, strikethrough, and code
- Headings: Multiple heading levels for structure
- Lists: Bullet points and numbered lists
- Code Blocks: Syntax-highlighted code snippets
- Images:
- Drag and drop images directly into the editor
- Paste images from clipboard
- Upload images via the image button
- Images are automatically uploaded and embedded
- Links: Add hyperlinks to external resources
- Tables: Create structured data tables
- Blockquotes: Highlight important information
🆕 Content Types
Knowledge entries can include:
- Application Workflows: Step-by-step processes in your application
- Business Logic: Rules and requirements explanations
- Technical Specifications: API details, data formats, integrations
- UI Guidelines: Design patterns and component behaviors
- Common Scenarios: Frequently tested user journeys
- Troubleshooting Guides: Known issues and solutions
- Platform-Specific Behaviors: Differences between web, iOS, and Android
Managing Knowledge
- Search: Find specific knowledge entries using the search bar
- Platform Filter: Filter knowledge by platform (All, Web, iOS, Android)
- Edit: Click the edit icon to update existing entries with full rich text editing
- Delete: Remove outdated or irrelevant information
- Pagination: Navigate through large knowledge bases
- Extract from Tests: Automatically generate knowledge from existing test cases
🆕 Extracting Knowledge from Test Cases
You can automatically extract knowledge from your existing tests:
- Navigate to a test case
- Click "Extract Knowledge" from the actions menu
- The system will analyze the test and generate:
- Application flow documentation
- UI element descriptions
- Business logic rules
- Review and edit the extracted knowledge before saving
🆕 Platform-Specific Knowledge
Platform-specific knowledge helps the AI understand differences between platforms:
- Web: Browser-specific behaviors, responsive design rules
- iOS: iOS UI patterns, gestures, app store guidelines
- Android: Material design patterns, Android-specific interactions
Impact on Testing
Knowledge entries help the AI:
- Generate more accurate test cases for each platform
- Better understand expected behaviors and platform differences
- Identify edge cases and potential issues
- Provide more relevant test maintenance suggestions
- Adapt tests appropriately when switching between platforms
Best Practices
- Be Specific: Provide detailed, actionable information
- Use Formatting: Structure content with headings and lists for clarity
- Include Examples: Add code snippets and screenshots where helpful
- Platform Awareness: Tag knowledge with appropriate platforms
- Regular Updates: Keep knowledge current with application changes
- Visual Documentation: Use images to show UI states and flows
10. Test Data
Manage test data files that are used in your automated tests, primarily for file upload scenarios.
Uploading Test Data
- Click the Upload File button to add new test data files
- Select a file from your system to upload as test data
- The file is uploaded immediately and a success or error message is shown
File size limit: The maximum allowed file size is 4.5 MB. Files exceeding this limit will fail to upload.
Managing Test Data
Uploaded test data files are displayed in a list with the following information:
- ID: A system-generated identifier for the file
- Name: The original file name uploaded by the user
File names must be unique and cannot be duplicated - Used By: The number of test cases that reference this file
Click the value to view the corresponding test cases - Last Updated: The last time the file was modified
Available actions:
- Download: Download the test data file
- Delete: Remove the test data file from the system
Warning
Deleting a test data file will also remove it from all test cases that reference it.
Using Test Data in Tests
Once uploaded, test data files can be used in test execution:
- Upload File Action: Use the upload file action in your test steps
- Natural Language: Reference files directly in test instructions (e.g., "Upload xyz.csv")
Test data files persist across test runs and are available until deleted.
11. Appendix: Google 2FA Setup Guide
This appendix provides step-by-step instructions for obtaining the TOTP secret key from your Google account.
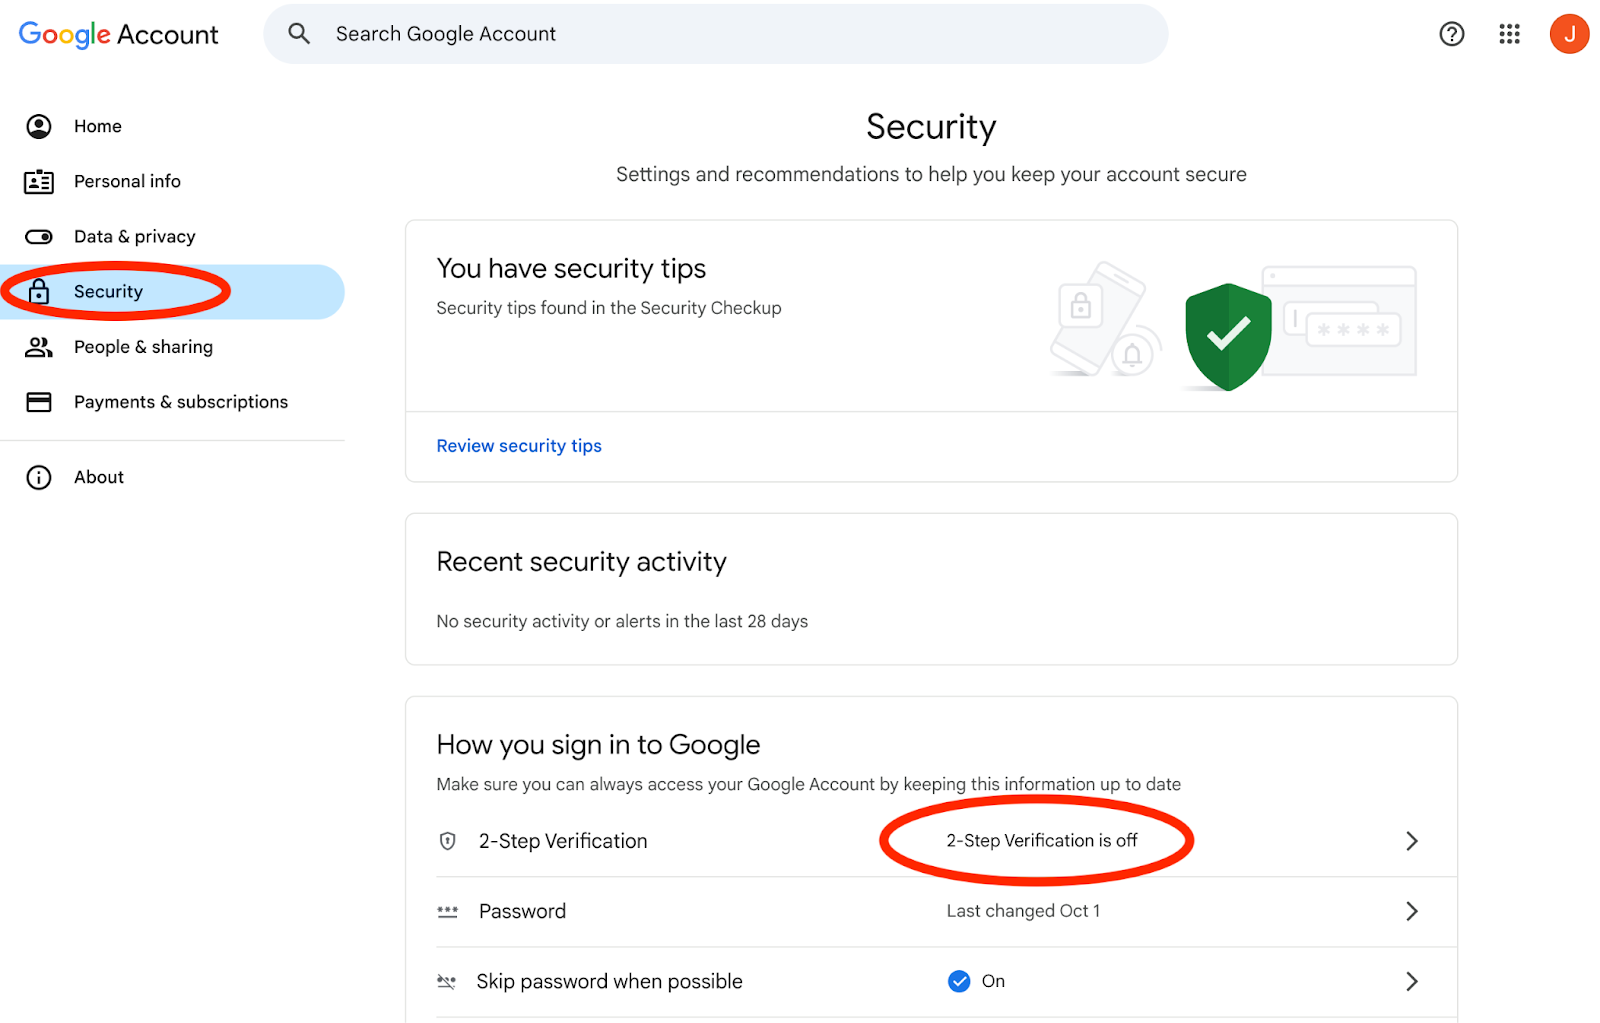
1. Access Google Account Security Settings
Navigate to your Google Account’s Security page.
Under How you sign in to Google, click “2-Step Verification”.
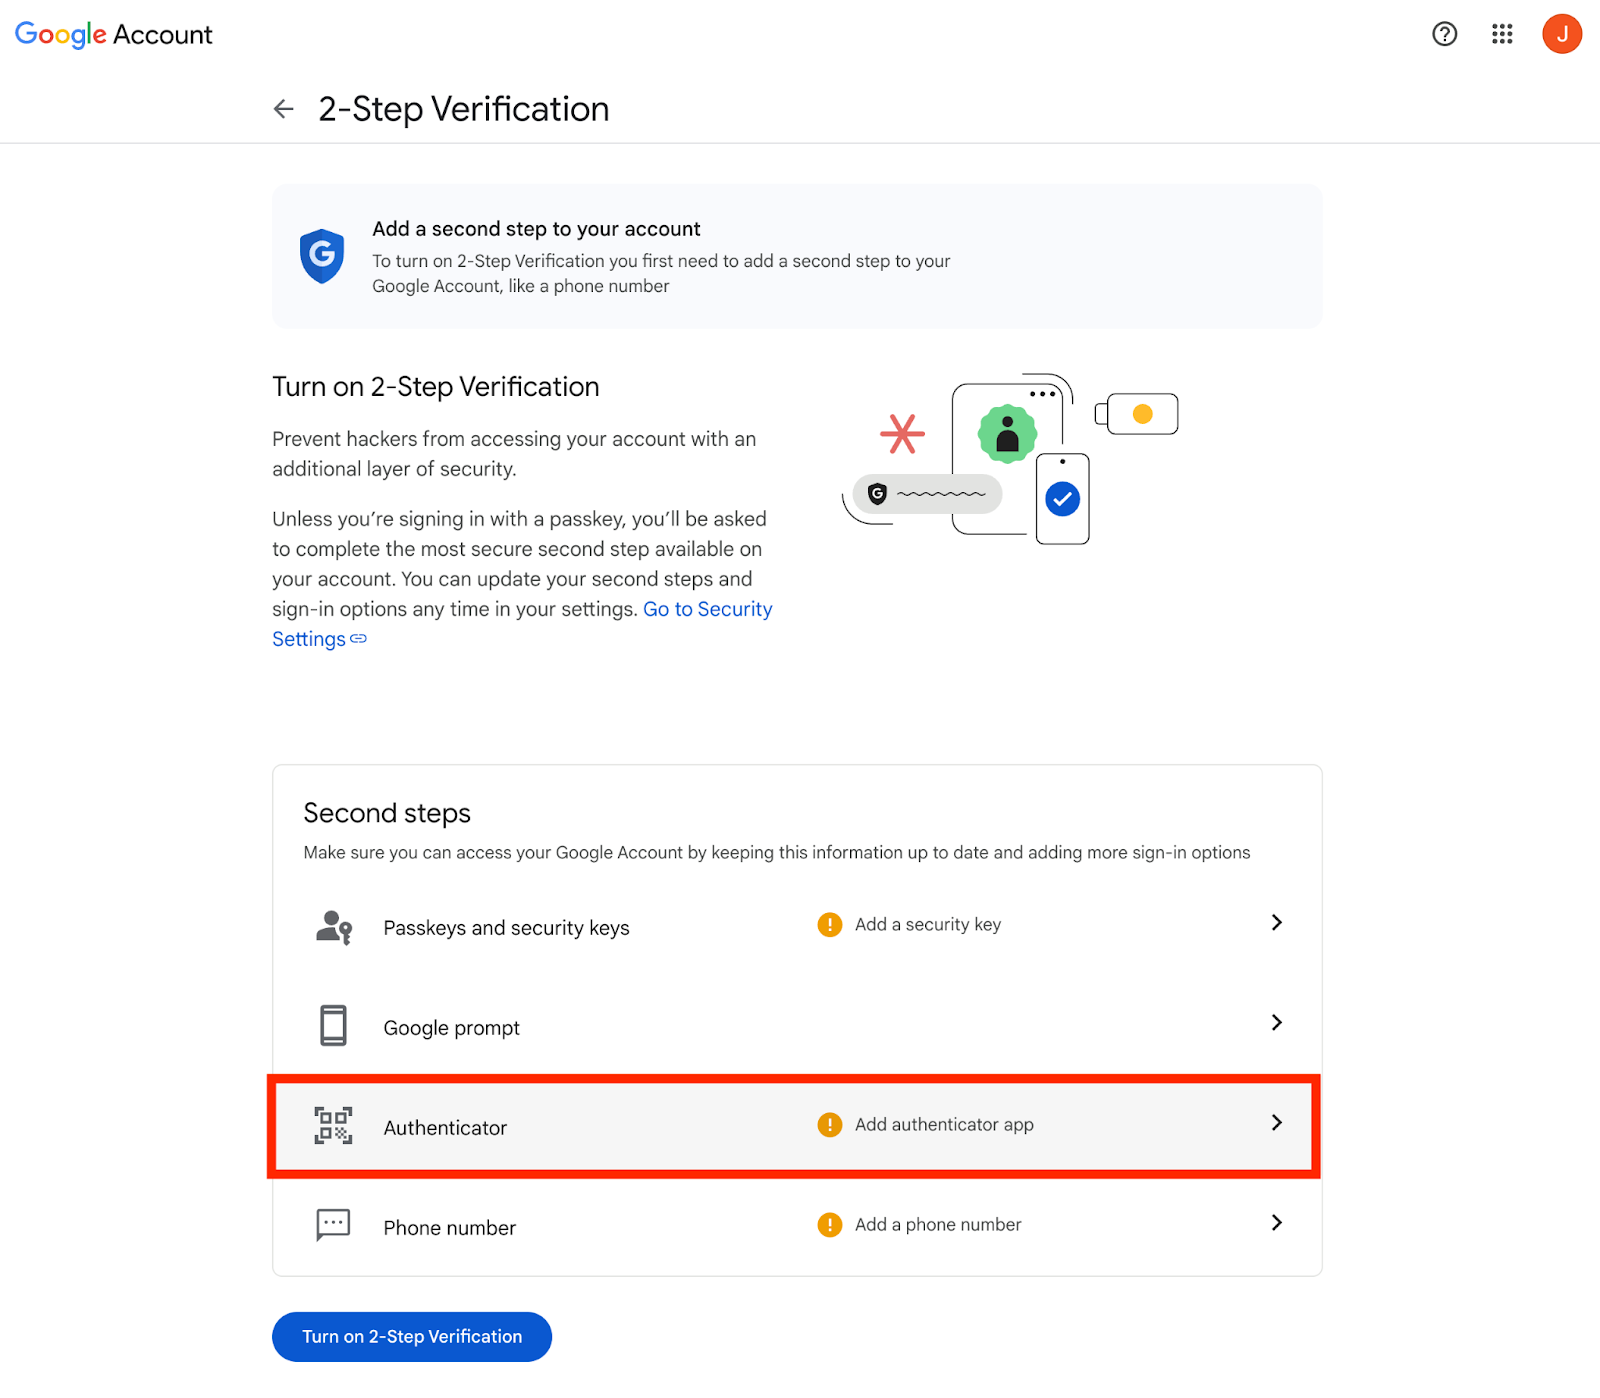
2. Start the 2-Step Verification Process
Scroll to the Second steps section and locate the Authenticator option.
Click “Add authenticator app”.
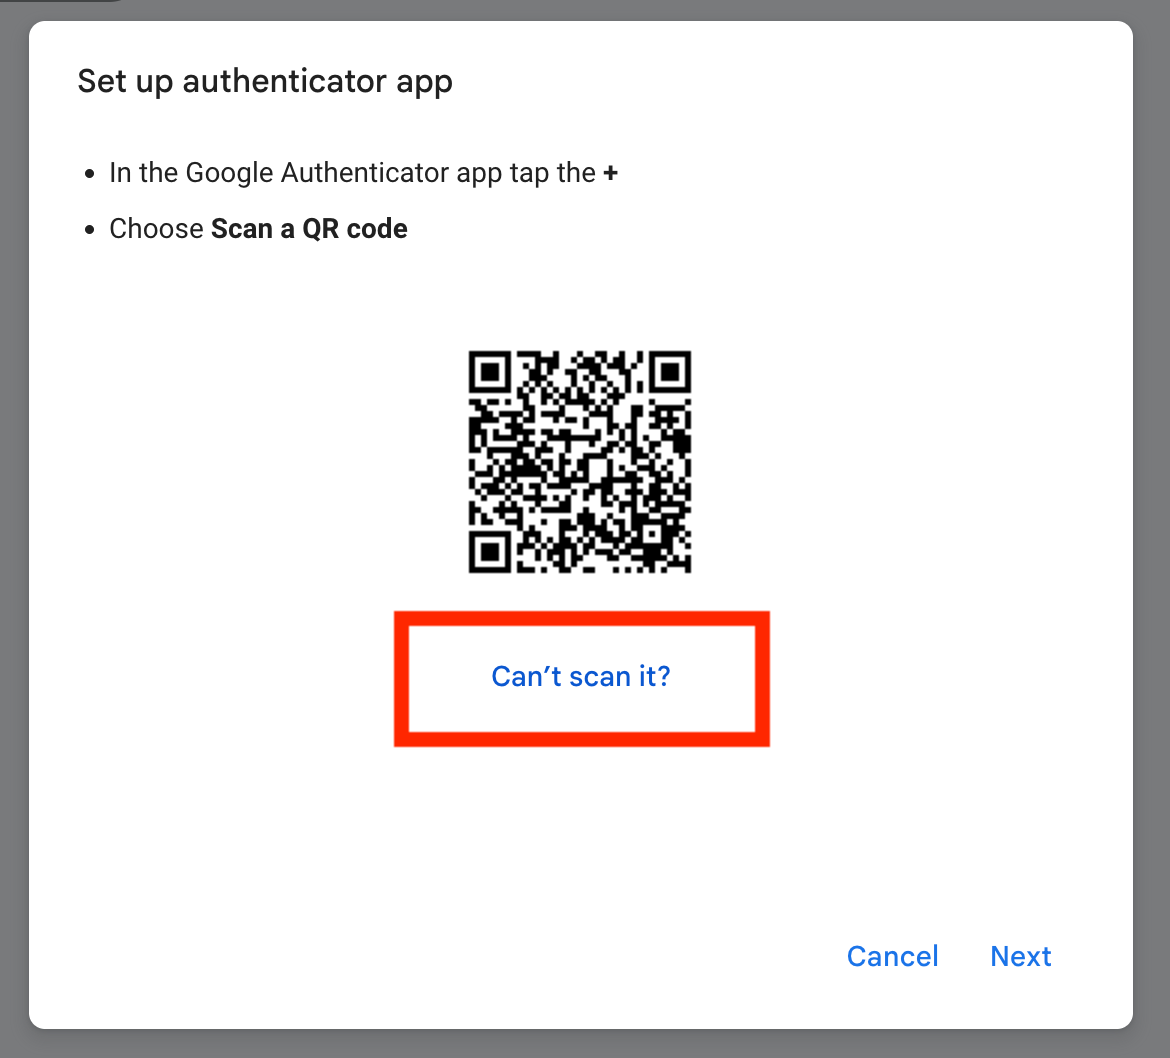
3. View the Secret Key
Google will first display a QR code.
Click “Can’t scan it?”.
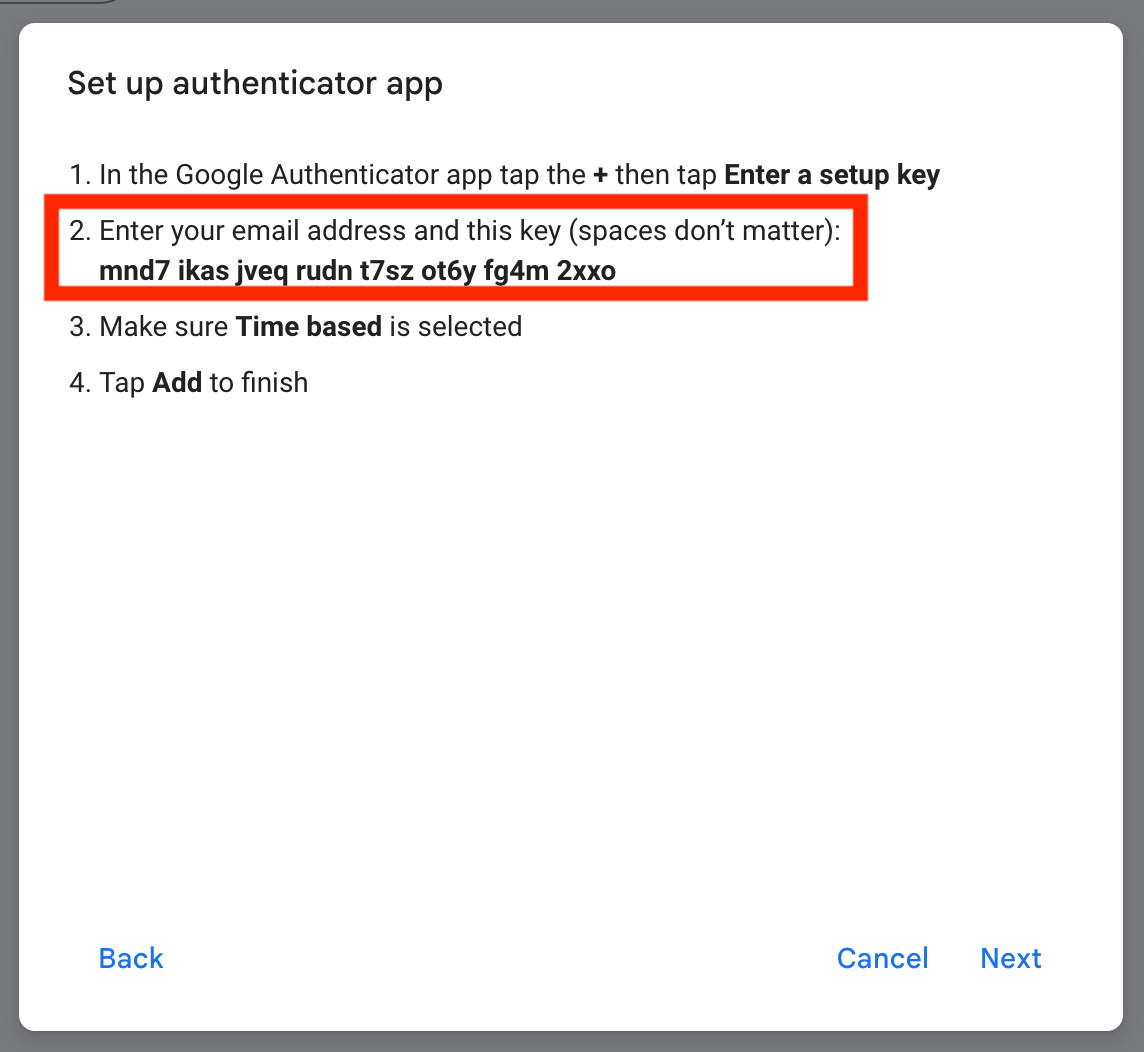
4. Copy the TOTP Secret Key
Copy the secret key shown on the screen.
5. Add the key to Shiplight test account and generate an OTP code
Once you have copied the key, configure it inside Shiplight.
Go to Settings → Test Accounts.
Edit the Google account used for automation.
Enable This account requires two-factor authentication.
Paste the secret key into the 2FA field.
Click “Generate OTP Code” to get the 6-digit verification code.
6. Verify the Code in Google
Return to Google and complete the verification using the newly generated OTP code.
Enter the 6-digit code generated by Shiplight.
Click “Verify”.
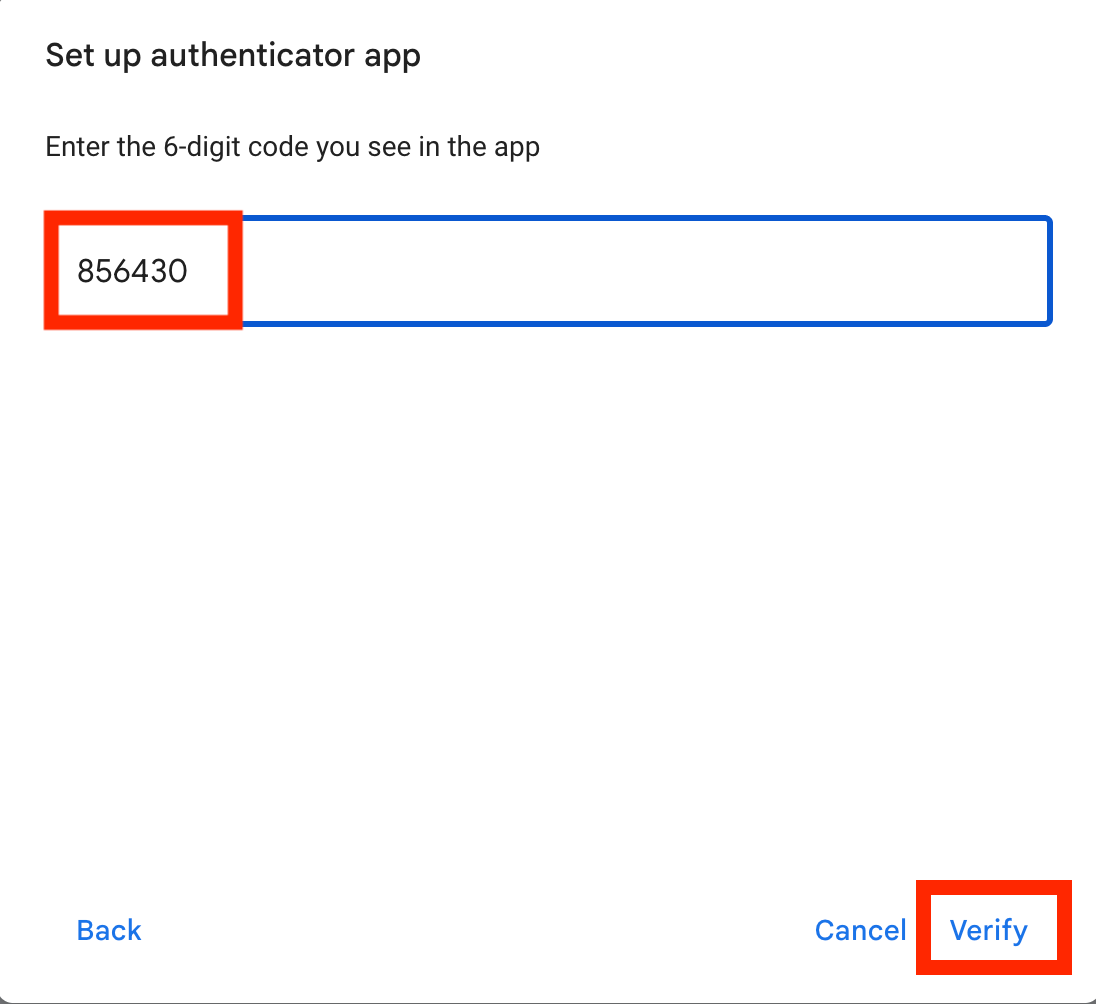
Google will validate the authenticator app setup.
Click “Turn on” and “Turn on 2-Step Verification” to activate.
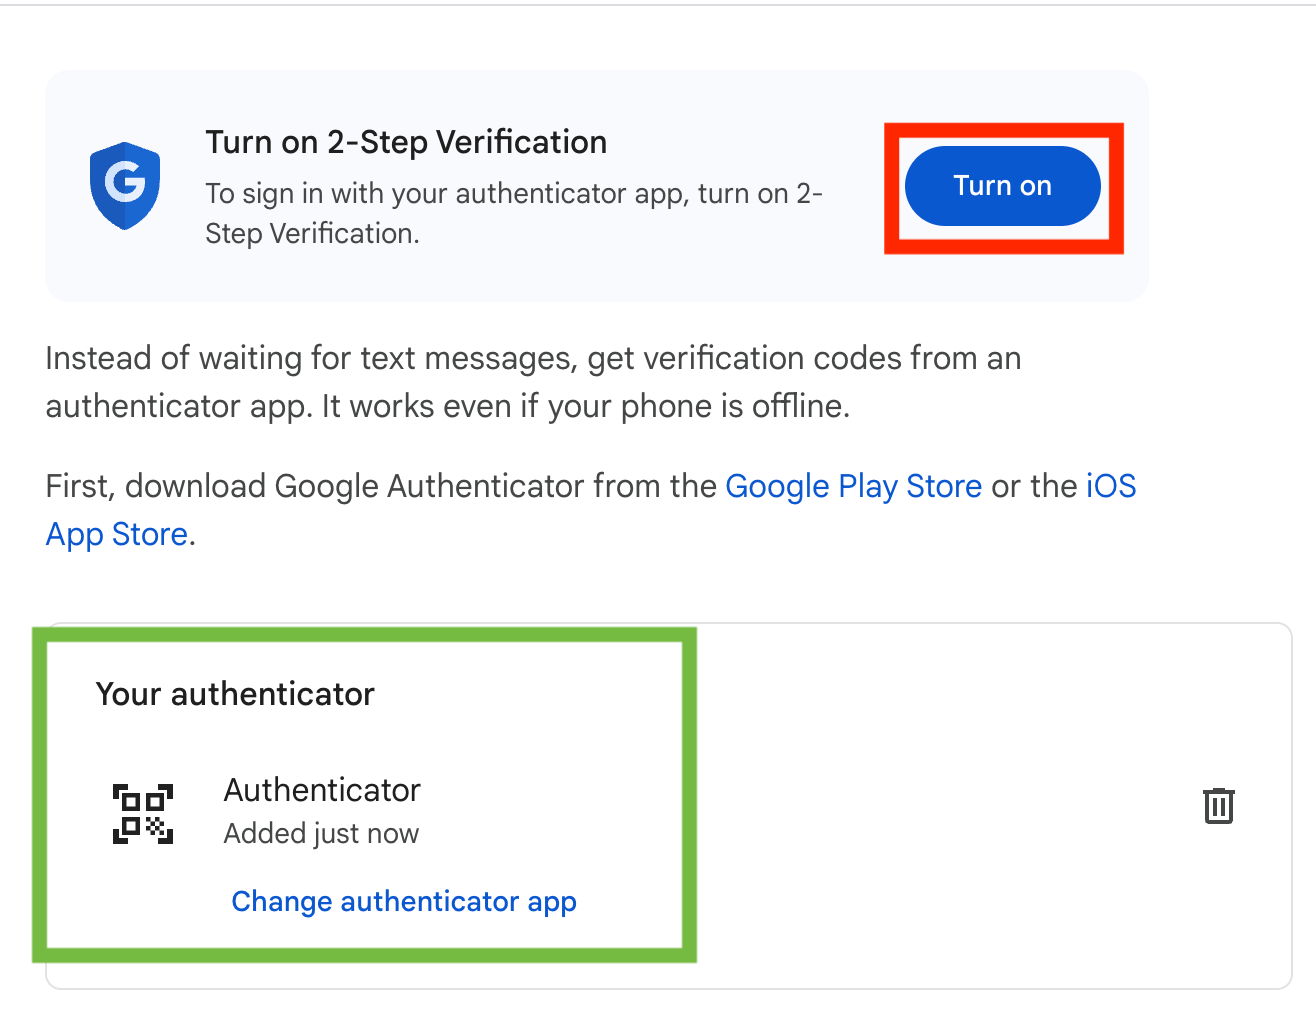

7. 2FA Enabled Successfully
Once verification is complete, Google displays a confirmation screen indicating that the authenticator app is active.
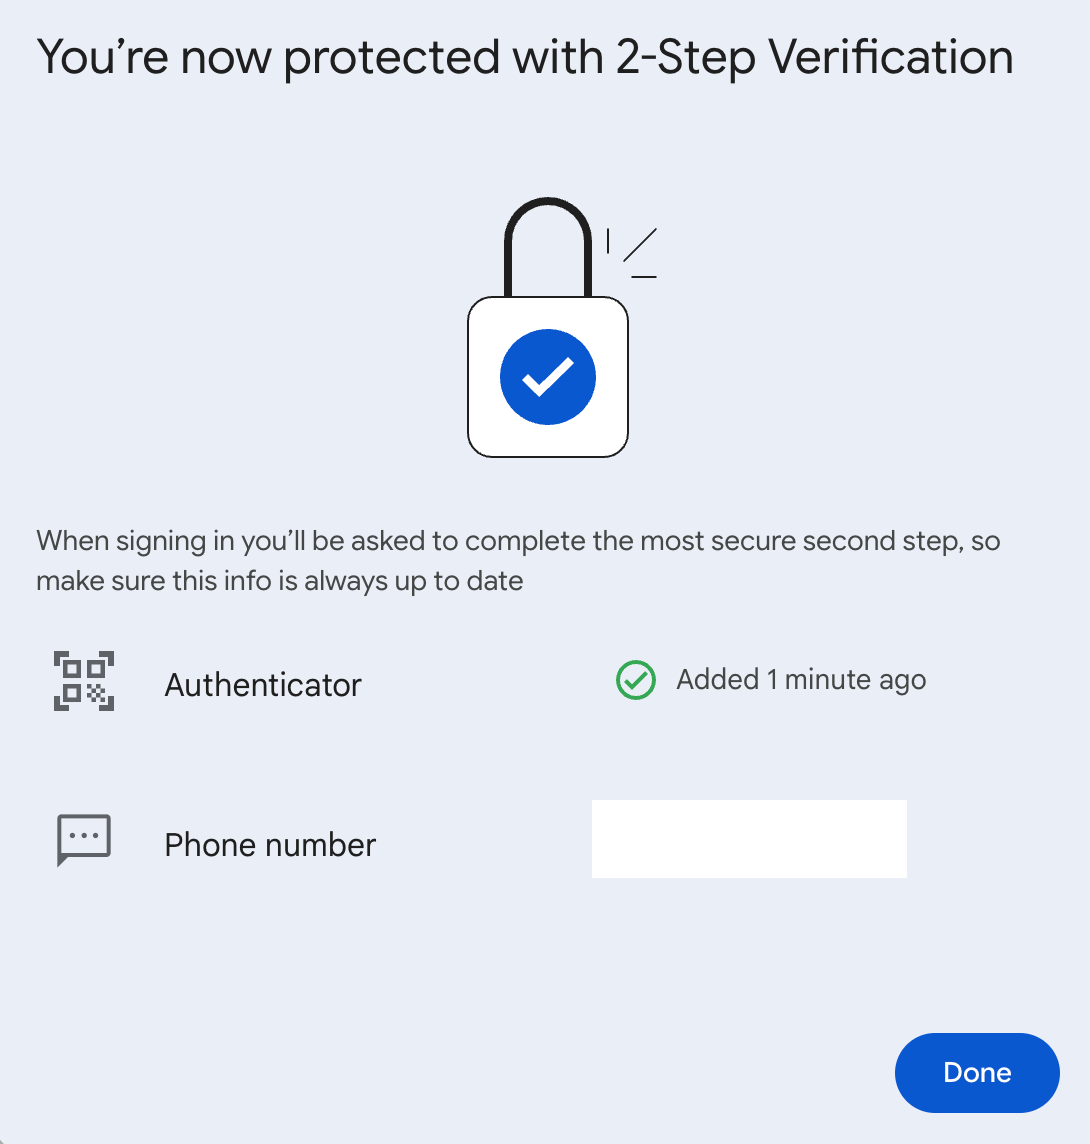
Your Google OAuth account is now fully secured with 2FA, and Shiplight can automatically generate authentication codes for reliable automated login.